Five Steps to Get Your Autonomous Drone to Fly High
I love flying drones, so my favorite part about the drone development process is flight testing. After spending hours assembling and calibrating the drone, I always look forward to finally watching it take flight. The best part about writing software for robots is that the result of your work can be seen immediately. It is important though, especially when building autonomous systems, to think through the validation process of what you are building. You can check that the software and hardware of your drone work well together during flight testing as well as discover interesting quirks to your drone. Here are five steps to prepare for your first flight with your autonomous drone:
Step 1: Adopt a Safety Mindset
Safety should be the top priority for any flight test. Drones, or small unmanned aerial systems (sUAS) are sophisticated vehicles and can be dangerous to you and the people around you. It’s important to always use caution when operating any drone (custom-built or off the shelf). The American drone industry is rapidly growing, and although working at a fast pace may work for innovation and execution, it should never compromise the safety of yourself or others during a flight test. Usually, flight testing mistakes result from hazardous attitudes that the flight testing team could exhibit. The FAA outlines common hazardous attitudes that might compromise the safety of your flight test:
- Anti-Authority: Don’t Tell Me What To Do
- Impulsivity: Do it Quickly
- Invulnerability: It Won’t Happen to Me
- Macho: I Can Do It
- Resignation: What’s The Use?
My attitude towards safety is to always measure twice and cut once. I would rather take the time to double check everything to ensure the safety of my team than speed through the process, miss important details, and re-test everything. Over the years I’ve learned that oversights could ultimately compromise safety, waste time and money. For more information on local drone rules or safety tips, visit the FAA’s website.
Tip: Assign a teammate to help you double check everything with you to make sure you don’t miss anything.
Step 2: Conduct Basic Systems Check Indoor Flight Test
The second step to flight testing your autonomous drone is to conduct a basic systems check, which can be performed indoors if you have a confined, netted space where the drone cannot hit a person.The first test is used to check that all software is running correctly on your ground control station and aircraft. This is especially important to test if you built a custom drone with dynamic hardware and software.
The night before your indoor flight test, do a sanity check and power up your drone to make sure your software and firmware versions are correct and the appropriate parameters are set. This ensures that your software and hardware will work together and prevents last minute scrambling.
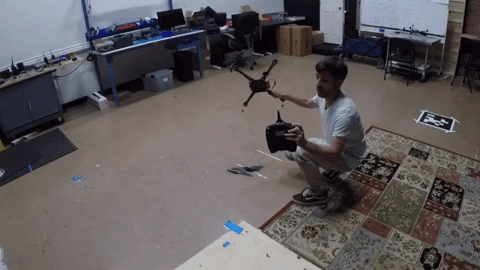
On the day of your indoor flight test, make sure you have enough space to conduct your test, plus a small buffer from people. It is important to perform this test in a contained area to prevent the drone from hitting anyone. Besides testing the software of your drone, also conduct manual tests to make sure the drone can complete basic functions. Some important things to look for when completing your indoor flight test are:
- ESCs calibration: check to make sure your ESCs and motors aren’t emitting any irregular sound as they oscillate (Most of the time a loose FMU plug is the culprit for irregular sounds)
- Manual flight: test the pitch, roll, yaw, climb, descend, hover
- Ground controller: make sure you have the right drivers and that they’re up to date
- Stability: Check that the aircraft is flying normally and that there the aircraft is reacting properly to your inputs and moving smoothly
- Connection: Check that you have a stable Datalink connection and that video streams
- VIO: Update appropriate VIO parameters for indoor flight testing
Visit our YouTube Channel for demos of our indoor and outdoor flight tests on our VOXL development drones including the m500, Seeker, Sentinel, and Starlings.
Tip: Record everything that happens during any flight test. Document any problems, quirks, problem recovery, aircraft altitude, mode, flight time, etc. You can reference and analyze this logged data later on and make changes to your drone accordingly. If you have enough people on your team, assign someone to be the record keeper. The flight test team at ModalAI® uses PX4’s Flight Review to analyze our flight testing data visually. Here’s an example of a log entry:
|
Flight 1: 2:15PM Position mode GPS hold testing |
Aircraft held a horizontal position well, but was not holding vertical altitude. |
|
Flight 2: 3:00PM Position mode GPS hold testing |
Aircraft seems to be making more noise than usual, we landed the aircraft and tightened the arms. This fixed the excess noise |
Step 3: Plan Your Flight
Once you’ve completed the indoor flight test, you can begin outlining a mission plan for the outdoor flight test. The mission plan is a critical document your flight testing team uses to outline the mission objective, testing site, team member roles, emergency actions, communication methods and safety procedures. Your indoor flight test log will help you outline your mission brief. Here is the mission brief we use at ModalAI.
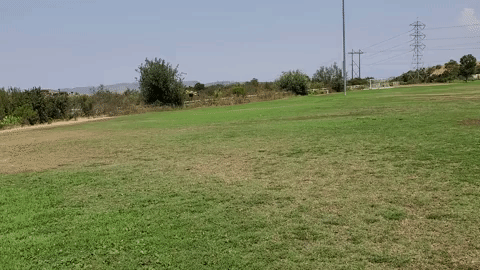
Your test site is an essential part of your mission brief. You might choose a different testing site each time depending on what you want your drone to accomplish. If you are testing for more straightforward applications, such as getting the drone to move from point A to point B, you might choose an open field. If you are testing for complicated applications such as search and rescue, you might choose a testing site with terrain that resembles the environment your drone would operate in.
Tip: When selecting a testing site for your flight test, it’s important to check that your airspace is clear from any potential hazards. The flight testers at ModalAI use Airmap to check if the area we want to use is clear to fly, meaning that there are no nearby hazards such as bad weather, fires, sporting events, fair grounds etc. Make sure you consult the FAA rules for flying UAS before flying.
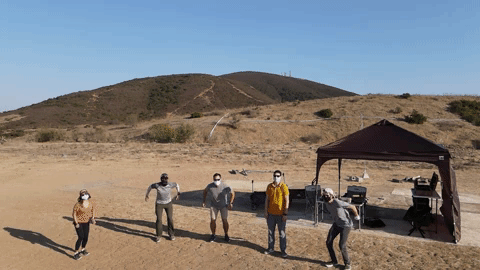
Step 4: Conduct Outdoor Flight Test
Before conducting your outdoor flight test, double check these three items:
- Test all the fail safes and kill switch on the drone. You want to make sure that if something were to happen during the test, such as lost connection to ground control, your drone will automatically switch into a “home” or “return” mode.
- Verify that your test site has no new changes that could compromise the safety of your test flight.
- Make sure every member on your team is familiar with the mission brief before you start.
The outdoor flight test is when you can test the autonomous features of your drone. Before testing these features, start testing in manual mode first so you have control when piloting the vehicle. If you start in manual mode first, you can make sure the aircraft is stable in flight and can control the throttle, pitch, roll, and yaw.
Once you’re comfortable with the responsiveness and stability of the drone in manual mode, you can test autonomous features such as altitude and position mode one at a time. For example, you can start with a small set of waypoints to get comfortable and check that the drone is behaving as expected. A simple 20m out and back pattern or square pattern could help build confidence. Once you feel comfortable that the drone is behaving as expected, start to expand the waypoints. It’s critical to obey local regulations such as staying under 400ft altitude and not flying within 5 miles of an airport.
If you notice any issues with your drone, you can remove levels of autonomy to easily identify the feature that caused the problem. Remember to record every command you give and action the drone takes during your flight test. If you discover an issue, record what command you gave to remedy the problem.
Tip: Video tape your flight test so you can re-watch the action for your log
Step 5: Write an After Action Report
The last step to flight testing your autonomous drone is summarizing how the tests went in an after action report. This is where your detailed logs come into play. The debrief documents all issues that might have arisen during testing and will be helpful to letting other members of your team know what needs to be fixed. Utilize all tools (logs, recordings, notes, etc.) at your disposal to help you diagnose and fix any issues. Your report will be used to generate next steps for your team. Here’s an example of an after action report entry:
 Tip: Make your after action report easily accessible by storing it on a shared cloud or drive
Fly High (but not above 400ft)
Flight testing can be one of the most exciting parts about drone development because it’s when you can see the fruits of your labor fly high right before your eyes. Remember these five steps the next time you’re ready to fly your autonomous drone. Be sure to adopt a safety mindset for the safety of yourself and your team. Conduct an indoor flight test to check the manual functionality of your drone and software. Select a flight testing venue that aligns with your testing objective and plan your outdoor flight. Conduct an outdoor flight test to assess the autonomous features of your drone. Finally, write an after action report to document all procedures and outcomes so you can generate next steps.
Have you made any new discoveries while testing your drone? Let us know in the comments below or email us at hello@modalai.com.

